 Since a few months I’m completely independent again, which at some times feels a bit scary but most of the time it just gives a great feeling of freedom. So now it’s time to use that freedom and do one of the things I always wanted to do more: sharing. So here’s the first of a long line of sharing how I run my new startups and also sharing the technical aspects.
So today I started on a project to implement search suggestions, which considering the current number of visitors I could easily and much more quickly do with MySQL but I choose for scalability. This means I want a lean and mean foundation and I chose the text-based search engine Solr. Because hosting is done by Webfaction and the posts on how to get this done are quite outdated I thought it would be nice to share the process so here we go.
In order for Solr to run it needs a servlet container such as Tomcat, Jetty, or Resin, I chose Tomcat because it was most referred to while doing my research. I know, hardly an intelligent way of choosing but I really don’t care since Solr should work fine on it and that’s the sole purpose. So here’s part one on installing Solr on Webfaction, which is installing Tomcat on Webfaction.
Step 1: Creating a new app
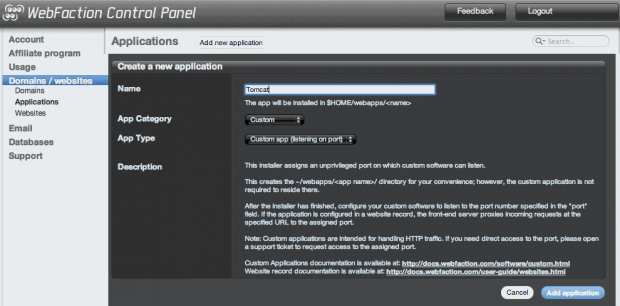
First thing you need to do is creating a custom app listening on a port. For this go go to panel.webfaction.com, login, go to “Domains / Websites -> Applications”. Click add new and choose the following options:

Once you’ve done this the app will be added and you will see what port has been assigned to the app:
![]()
Step 2: Installing Tomcat
In order to do this you need to first open an SSH session to your webserver, on Linux (and Max) it’s something like this:
1 2 | ssh username@username.webfactional.com cd /webapps/tomcat |
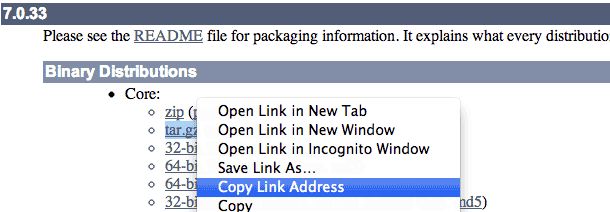
Next you need to check what’s the latest version of Tomcat and what the link to the download is. Just go to the Apache Tomcat download page and copy the link of the Core tar file download:

Now go back to your SSH session and type wget followed by the link you’ve just copied:
1 | wget http://mirror.sdunix.com/apache/tomcat/tomcat-7/v7.0.33/bin/apache-tomcat-7.0.33.tar.gz |
The response you get should be like this:
1 2 3 4 5 6 7 8 9 10 | --2012-11-25 08:07:51-- http://mirror.sdunix.com/apache/tomcat/tomcat-7/v7.0.33/bin/apache-tomcat-7.0.33.tar.gz Resolving mirror.sdunix.com... 74.206.97.82 Connecting to mirror.sdunix.com|74.206.97.82|:80... connected. HTTP request sent, awaiting response... 200 OK Length: 7696004 (7.3M) [application/x-gzip] Saving to: `apache-tomcat-7.0.33.tar.gz' 100%[======================================>] 7,696,004 495K/s in 16s 2012-11-25 08:08:08 (459 KB/s) - `apache-tomcat-7.0.33.tar.gz' saved [7696004/7696004] |
Next you need to extract the downloaded tar file:
1 | tar zxf apache-tomcat-7.0.33.tar.gz --strip 1 |
If the -strip 1 option gives an error just leave it out then and move all the files and subfolder from the Tomcat folder straight to the root using:
1 2 | cd apache-tomcat-7.0.33 cp -r *.* ~/webapps/tomcat/ |
Now Tomcat is installed but you need to do one more thing in order for it to work, you need to edit ~/webapps/tomcat/conf/server.xml to change the connector port 8080 to the port assigned to your custom app. Since I’m a Linux noob I opt to download the file, edit it and upload it again. What you will notice in the server.xml file is that there’s more than one connector defined but since we’ve got only one port at our disposal we can make only one connector work. My end goal is to install and use Solr so I need to make the http connector work by changing the port, so change this:
1 2 3 4 5 | Define a non-SSL HTTP/1.1 Connector on port 8080 --> <Connector port="8080" protocol="HTTP/1.1" connectionTimeout="20000" redirectPort="8443" /> |
into this:
1 2 3 4 5 | Define a non-SSL HTTP/1.1 Connector on port 8080 --> <Connector port="33333" protocol="HTTP/1.1" <!-- Use the port number assigned to your app--> connectionTimeout="20000" redirectPort="8443" /> |
Save server.xml (and upload if you’re a noob like me).
Now all that’s left is starting Tomcat with the following command in your SSH session:
1 | bin/startup.sh |
Which in the used version produces this output:
1 2 3 4 5 | Using CATALINA_BASE: /home/<username>/webapps/tomcat Using CATALINA_HOME: /home/<username>/webapps/tomcat Using CATALINA_TMPDIR: /home/<username>/webapps/tomcat/temp Using JRE_HOME: /usr Using CLASSPATH: /home/<username>/webapps/tomcat/bin/bootstrap.jar:/home/sangatpedas/webapps/tomcat/bin/tomcat-juli.jar |
Check whether Tomcat is working
Though the output above doesn’t give a reason to believe Tomcat is not running, I prefer to have some more tangible confirmation. Basically there are two ways to get this. The first is to check in your SSH session whether there’s an app listening on the assigned port number, in my case port 33333. You can do this with the netstat command:
1 | netstat -anp | grep 33333 |
Which in my case produced this output:
1 2 3 | (Not all processes could be identified, non-owned process info will not be shown, you would have to be root to see it all.) tcp 0 0 :::33333 :::* LISTEN 435/java |
Which confirm there’s an app listening on this port so that seems all fine. But obviously I don’t want to leave anything to change so I want to see the Tomcat welcome page.
WARNING: The following is just for testing purposes. In fact, if you want to use your Tomcat container for Solr you do wise to make it completely inaccessible for the outside world and solely accessible for your web server. So please be aware this should be temporary and for testing purposes only.
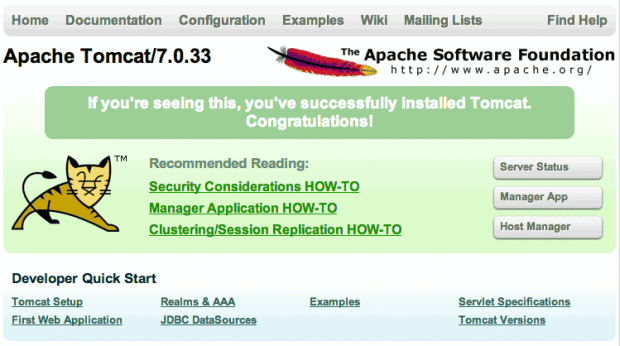
Assuming you already figured out how to add a website I keep this short. First add a hostname like tomcat.yourdomain.com. Next create a website in the webfaction panel, add the newly created hostname and assign the website to your tomcat app. Once you’ve done this you can open your webpage through the hostname you’ve added without any port number which should give you the Tomcat welcome page:
Again, don’t forget to make the container inaccessible for the outside world once you’re gonna run Solr in production. On securing Solr on Tomcat I will write in one of my next posts.
Adding Tomcat Users
You can only access the admin module when you have a login with the right credentials. To do this you can edit the file tomcat-users.xml in the conf folder of Tomcat.
1 2 3 4 5 6 7 8 | <?xml version='1.0' encoding='utf-8'?> <tomcat-users> <role rolename="manager-gui"/> <role rolename="manager-script"/> <role rolename="manager-jmx"/> <role rolename="manager-status"/> <user username="admin" password="H378Dhjsks" roles="manager-gui,manager-script,manager-jmx,manager-status"/> </tomcat-users> |
I hope this helped, next will be how to install Solr in this container and to get it working.


Pingback: How-to install Solr 4.0 with Tomcat 7 on Webfaction [Tutorial] - Sangat Pedas