 There must be a thousand posts out there about “boosting” the speed of your WordPress blog but it seems not much of them can show the before and after, the actual effect.Also most posts are pretty general on using the W3TC (W3 Total Cache) plugin but forget about the details and difficulties when configuring the W3TC plugin.
So for this post it’s mandatory that you use WordPress and you have installed the W3 Total Cache plugin, you can find the plugin here. Also you will need Firefox with the Firebug, for one to easy analyze which javascript and css files are loaded and secondly it’s one of the tools to test your site speed. Yep peepz, time for a true geek post!
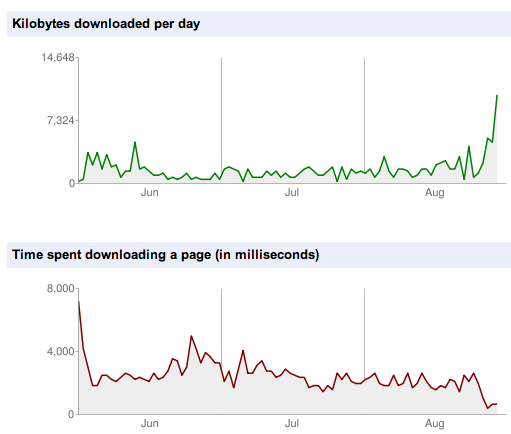
So, first let me show you what you can expect if you follow the steps in this post and are willing to spend 40 bucks.

Pretty impressive huh? SangatPedas went from an average loading time of 2,500 ms to just 500 ms, that’s 5 times faster! I gotta be honost, I also changed my theme and got rid of some plugins but I gained by far the most with correctly implementing minify and CDN using W3TC.
However, I definitely want to emphasize the importance of a good theme and a limited use of plugins. The techniques explained in this post are about how to load a chunk of data, but when the chunk of data is smaller to begin with you already have a head start. Just open your website in Firefox using Firebug and you’ll be amazed how time consuming some plugins and especially the social media integrations are. I decided to kick out the Google Plus button simply because one average it lead to a 1 second longer loading time which for such a functionality is way too much.
The basics of W3 Total Cache
W3TC consists of many separate parts which together form probably the best product for supercharging the performance of your WordPress blog. The configuration of most of the separate components is pretty straight forward and self explanatory. Before installing W3TC it’s a good idea to chmod 777 your .htaccess but don’t forget to change it back after. This will allow the plugin to automatically make the changes to your .htaccess needed for the plugin to work.
Page Cache
Just enable it and choose disk basic as page caching method. The plugin will request to make some changes in your .htaccess, just choose auto-install. Page cache is nice but don’t expect wonders if your site has only few visitors and you have decent hosting.
Minify
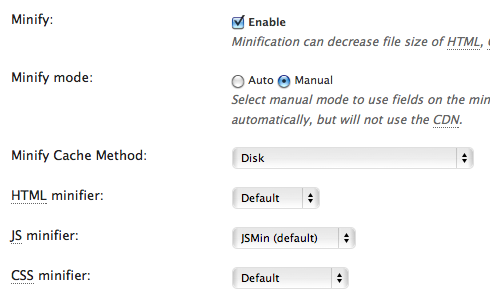
Now here it becomes interesting, basically minify, as the name suggests, minifies but also combines files in one. Now if you’re like me in a country where bandwidth is still a luxurious item this is where you can make the big wins and instantly cut off a significant amount of loading time, really significant if executed correctly. Just start with making the following settings for starters, these are the default settings and are pretty much the way to go:

Now the hard part starts, you need to add your javascript files and your css files. This could definitely take some time because there will be dependencies between your files which when combined in the wrong order will cause your blog not to work as intended. My advice, take it one step at the time, first add your css files and make sure everything is still working (don’t forget to check minify is indeed enabled when checking).
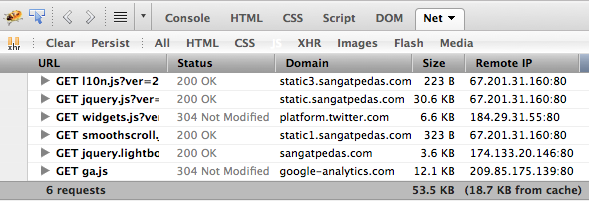
This is the part where you will need Firebug which allows you to analyze what js and css files are loaded and have to be added to the lists. Just open your site in Firefox and activate Firebug under “Tools -> Web Developer -> Firebug -> Open Firebug” and reload your page. Now choose “Net” from the Firebug menu bar and then in the bar below “CSS” which should look something like this:
Now just add the css files to the minify list in exact the same order, enable minify  and css minify, empty your page cache and reload your page again in Firefox. It should look something like this now:

Now you should do the same for your javascript files, make a screenshot of the firebug showing the js files being loaded and add the files in the order as shown in the screenshot. For each file choose “Non-blocking - embed in <head>” in the “Embed Location” dropdown. After that enable JS minify, empty the page cache and reload.
Javascript loading before minify (you should already love this clean theme):

and after:

Because the template is pretty neat and tidy we didn’t win much in size, but there are lots of nice looking but crappy “premium” templates out there so your win could be much more. But more important is that the number of requests have decreased from 17 to 9. The reason why this is so important is that the http protocol limits the number of concurrent connections between your browser en the web server to 4, meaning the less requests the faster the page will load.
Database Cache and Object Cache
Just enable and choose “Disk” for cache method, don’t expect wonders for an average WordPress blog unless you have some database intensive plugins running and lots of visitors.
Browser Cache
This one is the most easy to setup (just enable it) but also one of the most rewarding caching methods. Once enable most of your files (js, css, images etc) will be cached locally by your visitor’s browser and it will supercharge the user experience.
CDN
I just love this functionality just because it’s cool to use and because it will really boost your site performance world wide when you pick the right provider. CDN stands for Content Delivery Network and basically is a cloud like system in which a string of servers located in various regions around the world cache and deliver your content. I chose MaxCDN as CDN provider mainly because of it’s price and the default integration of this provider in W3TC.
Just follow these steps and your website performance will truly boost to the max.
1. Create an account at MaxCDN
2. Create a pull zone and add 4 hosts for your domain like static1.yourdomain.com, static2… etc. You could add more hosts but W3TC seems to get lost when you add more than 4 hosts;
3. Create an API key for this zone, you can do that under “Manage Account -> API”. Click “Add key”, select individual zone and in the dropdown select your zone.
4. Create the hosts in your DNS and CNAME them to the temporary URL given by MaxCDN. Wait 10 minutes before trying to ping them because your provider probably needs time to activate them. Pinging to soon can cause wrong DNS cache and then you have to wait a few days before it’s corrected;
5. In the tab “General” in W3TC select “NetDNA / MaxCDN” as provider but don’t activate CDN yet;
6. You to the tab “CDN” in W3TC and enter your API id and key from MaxCDN;
7. Add your hosts to the host list, maximum 4 because of a bug in W3TC when adding more;
8. Save your settings and click “Test NetDNA”, if all should go well you should get a green “Pass” after which you can enable CDN in the tab general settings and once more empty your page cache.
After you have done all this you should do a speedtest in Pingdom just to make sure everything loads well. I’ve had the situation where on my laptop everything loaded well but in fact there were problems with my zone which were easily revealed by Pingdom.
So what’s the effect? Well check the before loading times according to Pingdom (detailed analysis of best score):

And now the after loading times (detailed analysis of best score):

So average load time without CDN is 3.4 sec, average load time with CDN is 1.7 sec meaning the use of CDN cut loading time in half winning a stunning 1.7 sec load time! Before implementing minify and CDN average load time was 5 sec so in total all the steps in this post will bring the load time of your WordPress blog down to 35% of what it is before. Don’t forget that this is not only much appreciated by your visitors by search engines love fast loading websites!


Pingback: VPS.Net Cloud Hosting - Why I canceled my account after 2 days - Sangat Pedas
Pingback: Inside Sangatpedas.com - All Blog Stats Revealed #NoSecrets - Sangat Pedas
Pingback: Implementing Solr4 in Wordpress - No Plugin - Sangat Pedas